Integrating Volt's Embedded Checkout
Once you’re setup in Fuzebox, and you’ve created an application and got your credentials, integration of our embedded checkout can be achieved in just three steps.
- Request a payment (server-side)
- Prepare your page by including our Javascript library and telling us where you would like the checkout rendered
- Render the Volt Checkout in your page
If you’ve not yet setup Fuzebox and created an application
Request a payment
Authenticate
The first thing you’ll need to do is to authenticate with the API, which will provide you with an access token to request a payment.
Find out more about API authentication
Payment request
The details of the request header and body are described the API documentation for embedded payments.
{
    "currencyCode": "EUR",
    "amount": 100,
    "type": "OTHER",
    "uniqueReference": "123456789",
    "shopper": {
        "reference": "123456789",
        "email": "firstname.lastname@example.com",
        "firstName": "Firstname",
        "lastName": "Lastname",
        "ip": "150.160.170.180"
    },
    "callback": "order_id=662384a0&sample=parameter"
}
For merchants operating in the Australian market, please include the additional field additionalDescription in the payload. Refer to the Australian integration guide for more details.
The shopper.reference is used by our systems to identify returning shoppers. We recommend using an identifier you already use, e.g. the user id in your own system. If you use sensitive data we would recommend hashing it before sharing it with Volt.
The ability to identify returning shoppers is especially useful for Circuit Breaker as it allows you to configure rules and limitations for specific shoppers to prevent abnormal or unwanted behaviour.
Try it yourself using our Postman collection
Additional data to return when redirecting
You can also define a string of parameters in the callback key of the JSON, which we’ll append to the payment return URLs.
For example, "callback": "order_id=662384a0&sample=parameter"will append the order_id and sample parameters to the URL when we redirect the shopper back to your checkout.
Please do not use volt, volt-signature or volt-timestamp as names for your callback parameters – these are reserved names used by the redirect process and will be ignored.
Please note that callback parameter and the redirect itself is currently not supported in Australian embedded checkout.
Find out more about the redirect return process
Payment response
A successful payment request returns an id and a token. The id is a unique identifier for this payment once it is created, which we recommend storing it in your system for any future reference.
The Volt Embedded Checkout requires both values to get rendered on the client. You will need to pass both values to your client application.
{
    "id": "509c7915-0e16-4927-9b73-efd629e9273a",
    "token": "eyJ...5sQ"
}
Payments created using Volt’s Embedded Checkout will only be visible in Fuzebox once the shopper has redirected to their bank.
Prepare your page
Add our JavaScript library
Add the Volt JavaScript library to your client-side HTML using the following code.
<script src="https://js.volt.io/v1"></script>JavaScript library documentation
Add a placeholder for the checkout
Add a placeholder div with the id of volt-payment-component where you would the Volt Embedded Checkout rendered in your page.
Please note that for the iFrame containing the checkout to display properly, a minimum width is required of 320px. If this dimension is less than 320px, we cannot guarantee that all components will display correctly.
<div id="volt-payment-component">
    <!-- Volt embdedded checkout will be rendered here -->
</div>
Render the checkout
To initialise the Volt Components and render the Embedded Checkout, use the code below, setting the constant mode to the value of sandbox or production as appropriate.
const mode = "sandbox" // Set to sandbox or production as required

const volt = new window.Volt({ mode })

function async init() {
  const response = fetch('https://api.your-page.com/create-volt-payment')
  const payment = await response.json();

  const paymentContainer = volt.payment({
    payment,
    language: "pl", // optional - ISO 639-1
    country: "PL", // optional - ISO 3166
  })

  const paymentComponent = paymentContainer.createPayment();
  paymentComponent.mount("#volt-payment-component");
}
Here we have an example page containing the code and elements required for a basic Embedded Checkout setup
<!DOCTYPE html>
<html lang="en">
    <head>
        <meta charset="UTF-8">
        <meta name="viewport" content="width=device-width, initial-scale=1.0">
        <meta http-equiv="X-UA-Compatible" content="ie=edge">
        <title>Your client</title>
        <!-- This is the Volt JS library -->
        <script src="https://js.volt.io/v1"></script>
    </head>
    <body>
        <h1>Volt Embedded Checkout</h1>
        <div id="volt-payment-component">
            <!-- Volt Drop-in component will be rendered here -->
        </div>
        <div id="volt-payment-terms">
            <!-- Volt payments terms -->
        </div>
        <a id="volt-pay-button" class="button">Pay now</a>
        <script>
            const mode = "sandbox"; // sandbox/production
            const volt = new window.Volt({ mode });

            function init() {
                // The payment object is the response from the payment request.
                // Replace it with your server response.
                payment = {
                    "id": "509c7915-0e16-4927-9b73-efd629e9273a",
                    "token": "eyJ...5sQ"
                }

                // Create payment container
                paymentContainer = volt.payment({
                    payment,  // Payment response from the server, containing id and token.
                    language: "en", // optional - ISO 639-1
                    country: "PL", // optional - ISO 3166
                });

                // Fetch when the language is changed
                paymentContainer.on("languageChange",(e)=>{
                    console.log("Changed language to: " + e.language)
                });
                // Fetch when the country is changed
                paymentContainer.on("countryChange",(e)=>{
                    console.log("Changed country to: " + e.country)
                });
                paymentContainer.on("error",(e)=>{
                    console.log("Error " + e.code + " message: \"" + e.message + "\"")
                });

                // Create payment component
                paymentComponent = paymentContainer.createPayment({
                    displayQRCode: true, // optional, default: true (requires displayPayButton = true)
                    displayPayButton: true, // optional, default: true
                    autoHeight: true // optional, default: true
                });

                paymentComponent.mount("#volt-payment-component");

                //
                // If you choose to display the pay button outside of Volt Checkout,
                // you need to display the terms above the button.
                //
                // Create the terms object
                // termsComponent = paymentContainer.createTerms();
                //
                // Element above the pay button, should be a <div>
                // termsComponent.mount("#volt-payment-terms");
                //
            }
            // Render Volt Embedded Checkout
            init();
        </script>
    </body>
</html>
Updating the payment amount
One of the new features of Embedded Checkout (v2) is the ability to modify the amount of the payment request after it was created. This allows the shopper to add some additional items to their order while they are already on the checkout page.
Please note that you are only eligible to modify those payment request details until the payer gets redirected to the bank.
Modifying payment request details is possible by making a PATCH request to Volt API from your backend application. The request should contain an authorization header, similar to creating a new embedded checkout. All of the options you can see in the example are available for change. If you don’t need to update all of them at once, you can pick just those that match your use case.
Location
PATCH /dropin/{dropinPaymentRequestId}
Request headers
Authorization: Bearer <token>
Request body
{
  "amount": 100
}
Response
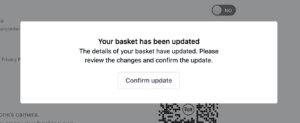 After receiving a successful response where the payment request has been modified, we will inform the shopper about the changes using a pop-up, either once they have clicked on the “Pay” button, or when they try to change the bank.
After confirming the update, the shopper can continue with payment as usual.
{
  "id": "fc89fd80-ba96-406f-b4ff-f9e0dd4a5907",
  "token": "someToken"
}
German / Italian banks
Some banks, specifically in Germany and Italy, require the pre-collection of login credentials directly on our checkout, due to their specific implementation of open banking. For these banks, we need to keep the redirection to our hosted checkout page to collect the required details.
This means that, where the shopper selects one of these banks in the embedded checkout on your site, they will be asked to continue the payment on our hosted checkout page. They will be redirected to that page to provide the necessary information and finalise the payment.
For these banks, we cannot offer the option to update the payment amount once the bank has been selected.