Hosted checkout
The hosted checkout integration utilises Volt’s payment page for payment initiation. It offers a quick and secure way to start accepting payments without extensive development efforts.
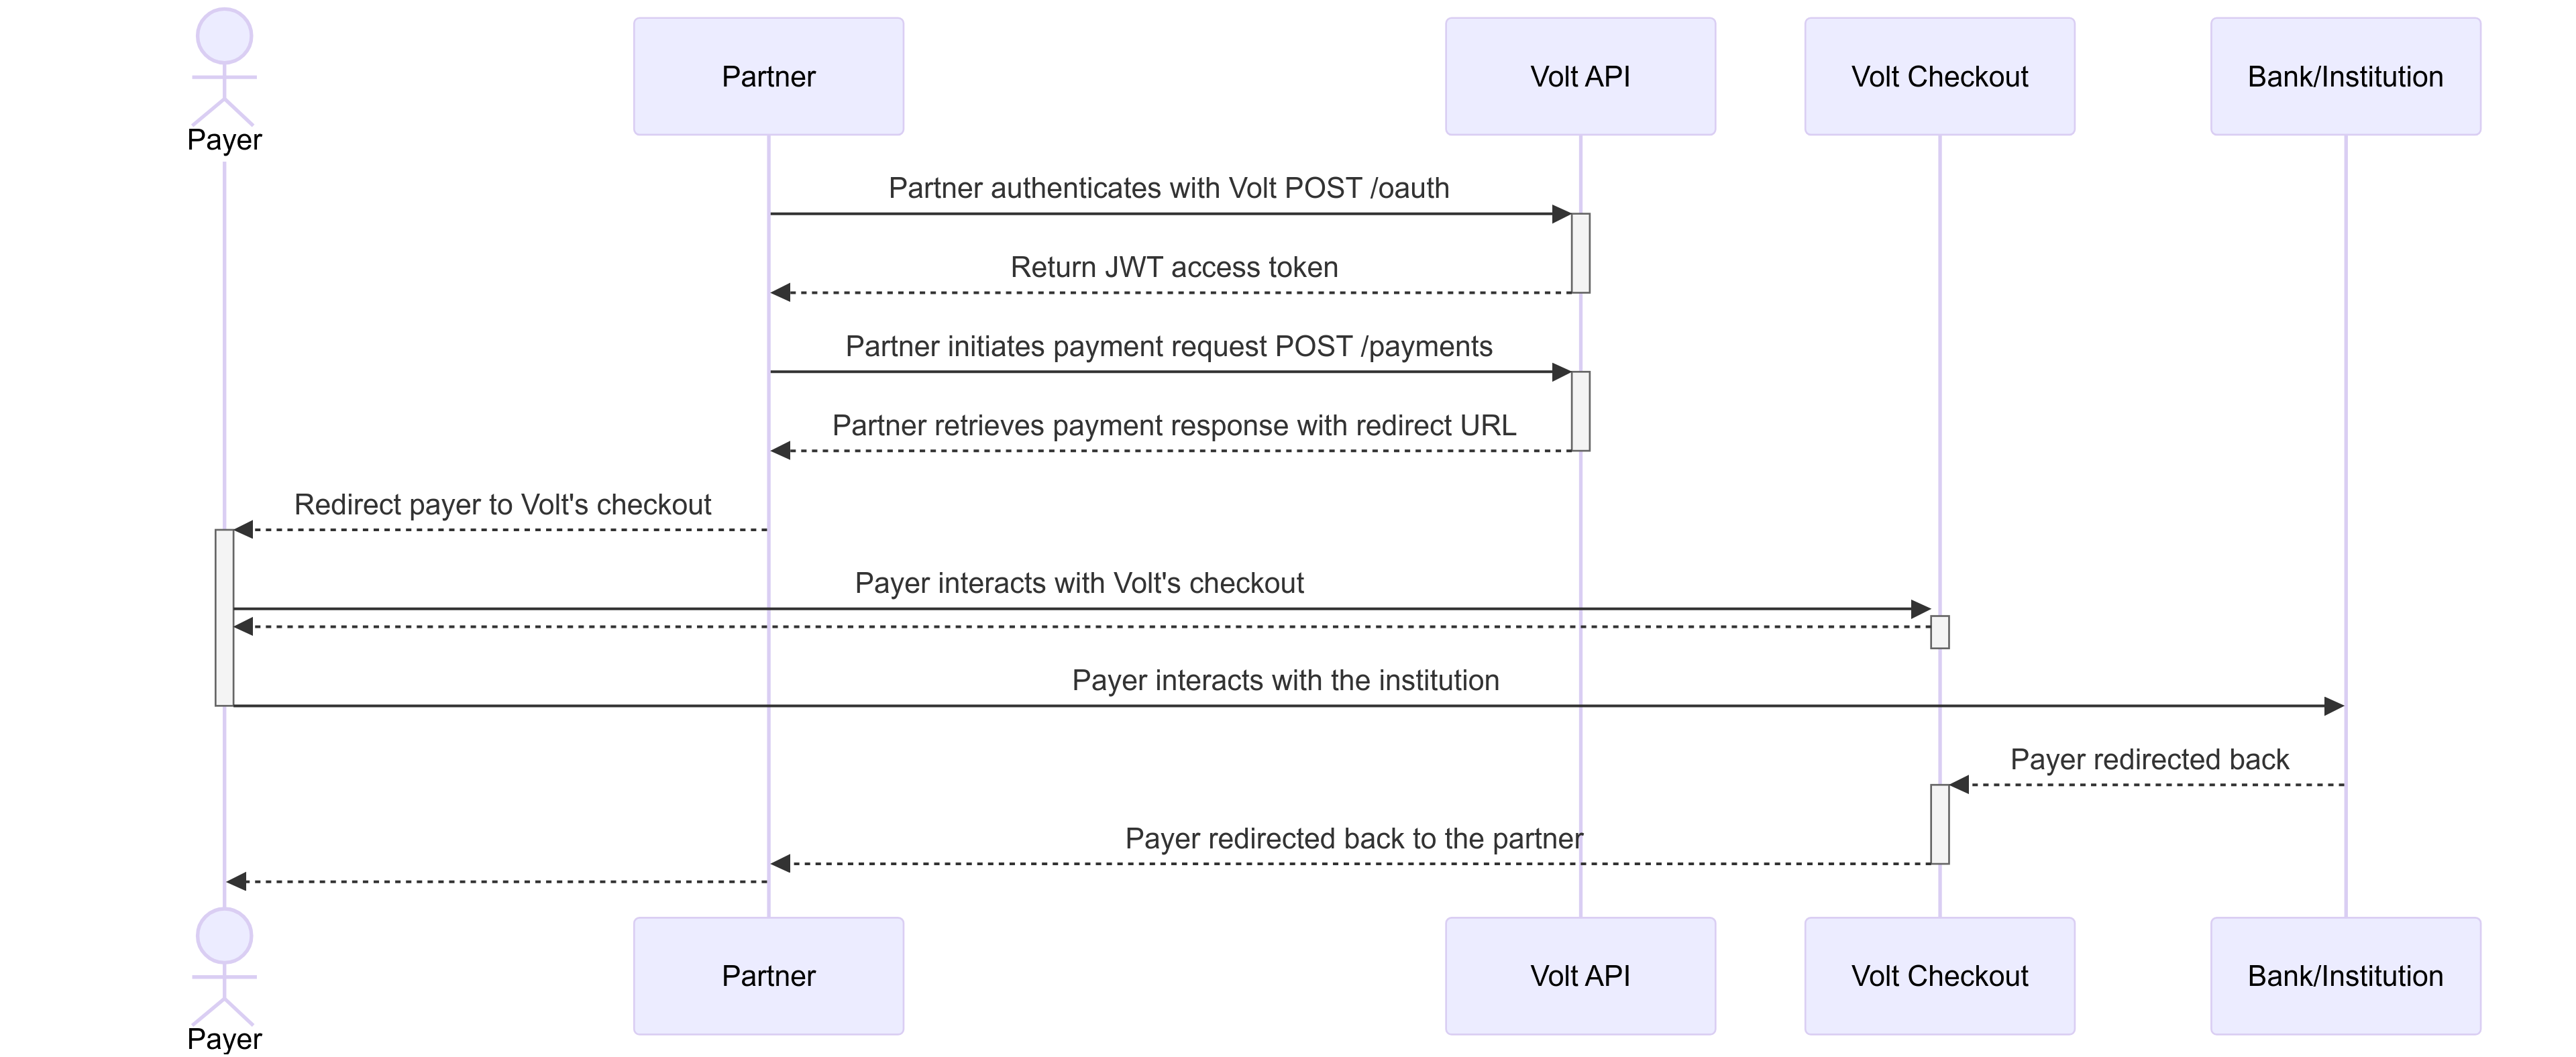
The payer is redirected to Volt hosted checkout to gather all required information to proceed with the payment. Then, the payer is redirected to the selected institution’s user interface (UI) to authenticate and authorise the payment. This flow delegates the responsibility of handling user credentials and authorisation to the institution’s secure environment.

Steps:
-
Partner collects payment data from the payer.
Gather necessary data such as currency, amount, and required account identifiers. -
Partner authenticates with Volt.
Use this guide to handle authentication with Volt’s API. - Partner initiates payment request.
Use thePOST /paymentsendpoint. The response includes a redirect URL to which the user should be redirected.
Hosted checkout integration requires passing X-Volt-Initiation-Channel HTTP header with value hosted.
{
    //...
    "paymentInitiationFlow": {
        "status": "PROCESSING",
        "details": {
            "reason": "AWAITING_USER_REDIRECT",
            "redirect": {
                "url": "https://vo.lt/short",
                "directUrl": "https://checkout.volt.io/{paymentId}"
            }
        }
    }
    //...
}-
Payer is being redirect to the Volt hosted checkout.
Volt will handle redirecting the payer to their bank to complete authorisation. -
After authorisation payer returns to Volt hosted checkout status page.
Status page will show the result of payment initiation process. - Payer returns to the partner’s page.
Full control is given back to the partner.
You can configure the return URL in the Fuzebox or pass it directly in the POST /payments request.
A detailed guide on configuring return URLs in the Fuzebox can be found here.
- Partner receives the payment notification about the payment status.
Notification (webhook) will be sent to you.
You can configure payment notifications in the Fuzebox or pass it directly in the POST /payments request.
A detailed guide on configuring notifications in the Fuzebox can be found here.
Build your own bank list
While using the hosted checkout integration, you can enhance your customer experience by building your bank selection interface. This allows you to maintain consistent branding and user experience throughout the initial stages of the checkout process before redirecting users to Volt’s hosted payment page.
How to build your bank list:
- Fetch the list of available banks:
- Use the
GET /institutionsendpoint from Volt’s API to retrieve the list of supported banks (institutions) for your region.
- Use the
- Build your bank selection UI:
- Design a bank selection interface that aligns with your website or application’s branding.
- Display the list of banks retrieved from the API, including logos and names, to allow users to easily select their preferred bank.
- Initiate the payment with the selected bank:
- The rest of the user journey is the same. Call the Volt hosted checkout with bank ID that was selected by the user and redirect the user to Volt.
Benefits of building your bank list:
- Enhanced user experience:
- Maintain consistent branding and user interface throughout the initial stages of the payment process.
- Provide a seamless transition for users from your platform to the payment process.
- Control over bank presentation:
- Highlight preferred banks or customise the display order based on your customer demographics.
- Flexibility:
- Update the bank list dynamically by periodically fetching the latest data from Volt’s API.
Considerations:
- Regular updates:
- Banks may be added or removed over time; regularly update your bank list by fetching the latest institutions from the API.
- Fallback handling:
- In case a bank is temporarily unavailable, implement a mechanism to inform users or guide them to select an alternative bank.
By building your bank list as part of the hosted checkout integration, you can offer a more personalised and seamless payment experience while leveraging Volt’s robust payment processing capabilities.
- On this page
- Hosted checkout
- Integration guide
- Build your own bank list