API-only
The API-only integration allows you to build your own user interface for the payment experience, giving you full control over the look and feel, enabling seamless integration with your existing platform. Responses from Unified Global Payments API will guide you through the whole payment initiation process, telling what is required to move things forward, whether to provide additional input, or redirect the payer to the given URL for payment authorisation.
The API-only integration requires polling. During the initiation flow you will be required to periodically call Volt’s API to check where the payer is in the flow, or if flow has already been finished.
- Redirect authorisation
- Pre-authorisation
- Embedded authorisation with SCA App
- Embedded authorisation
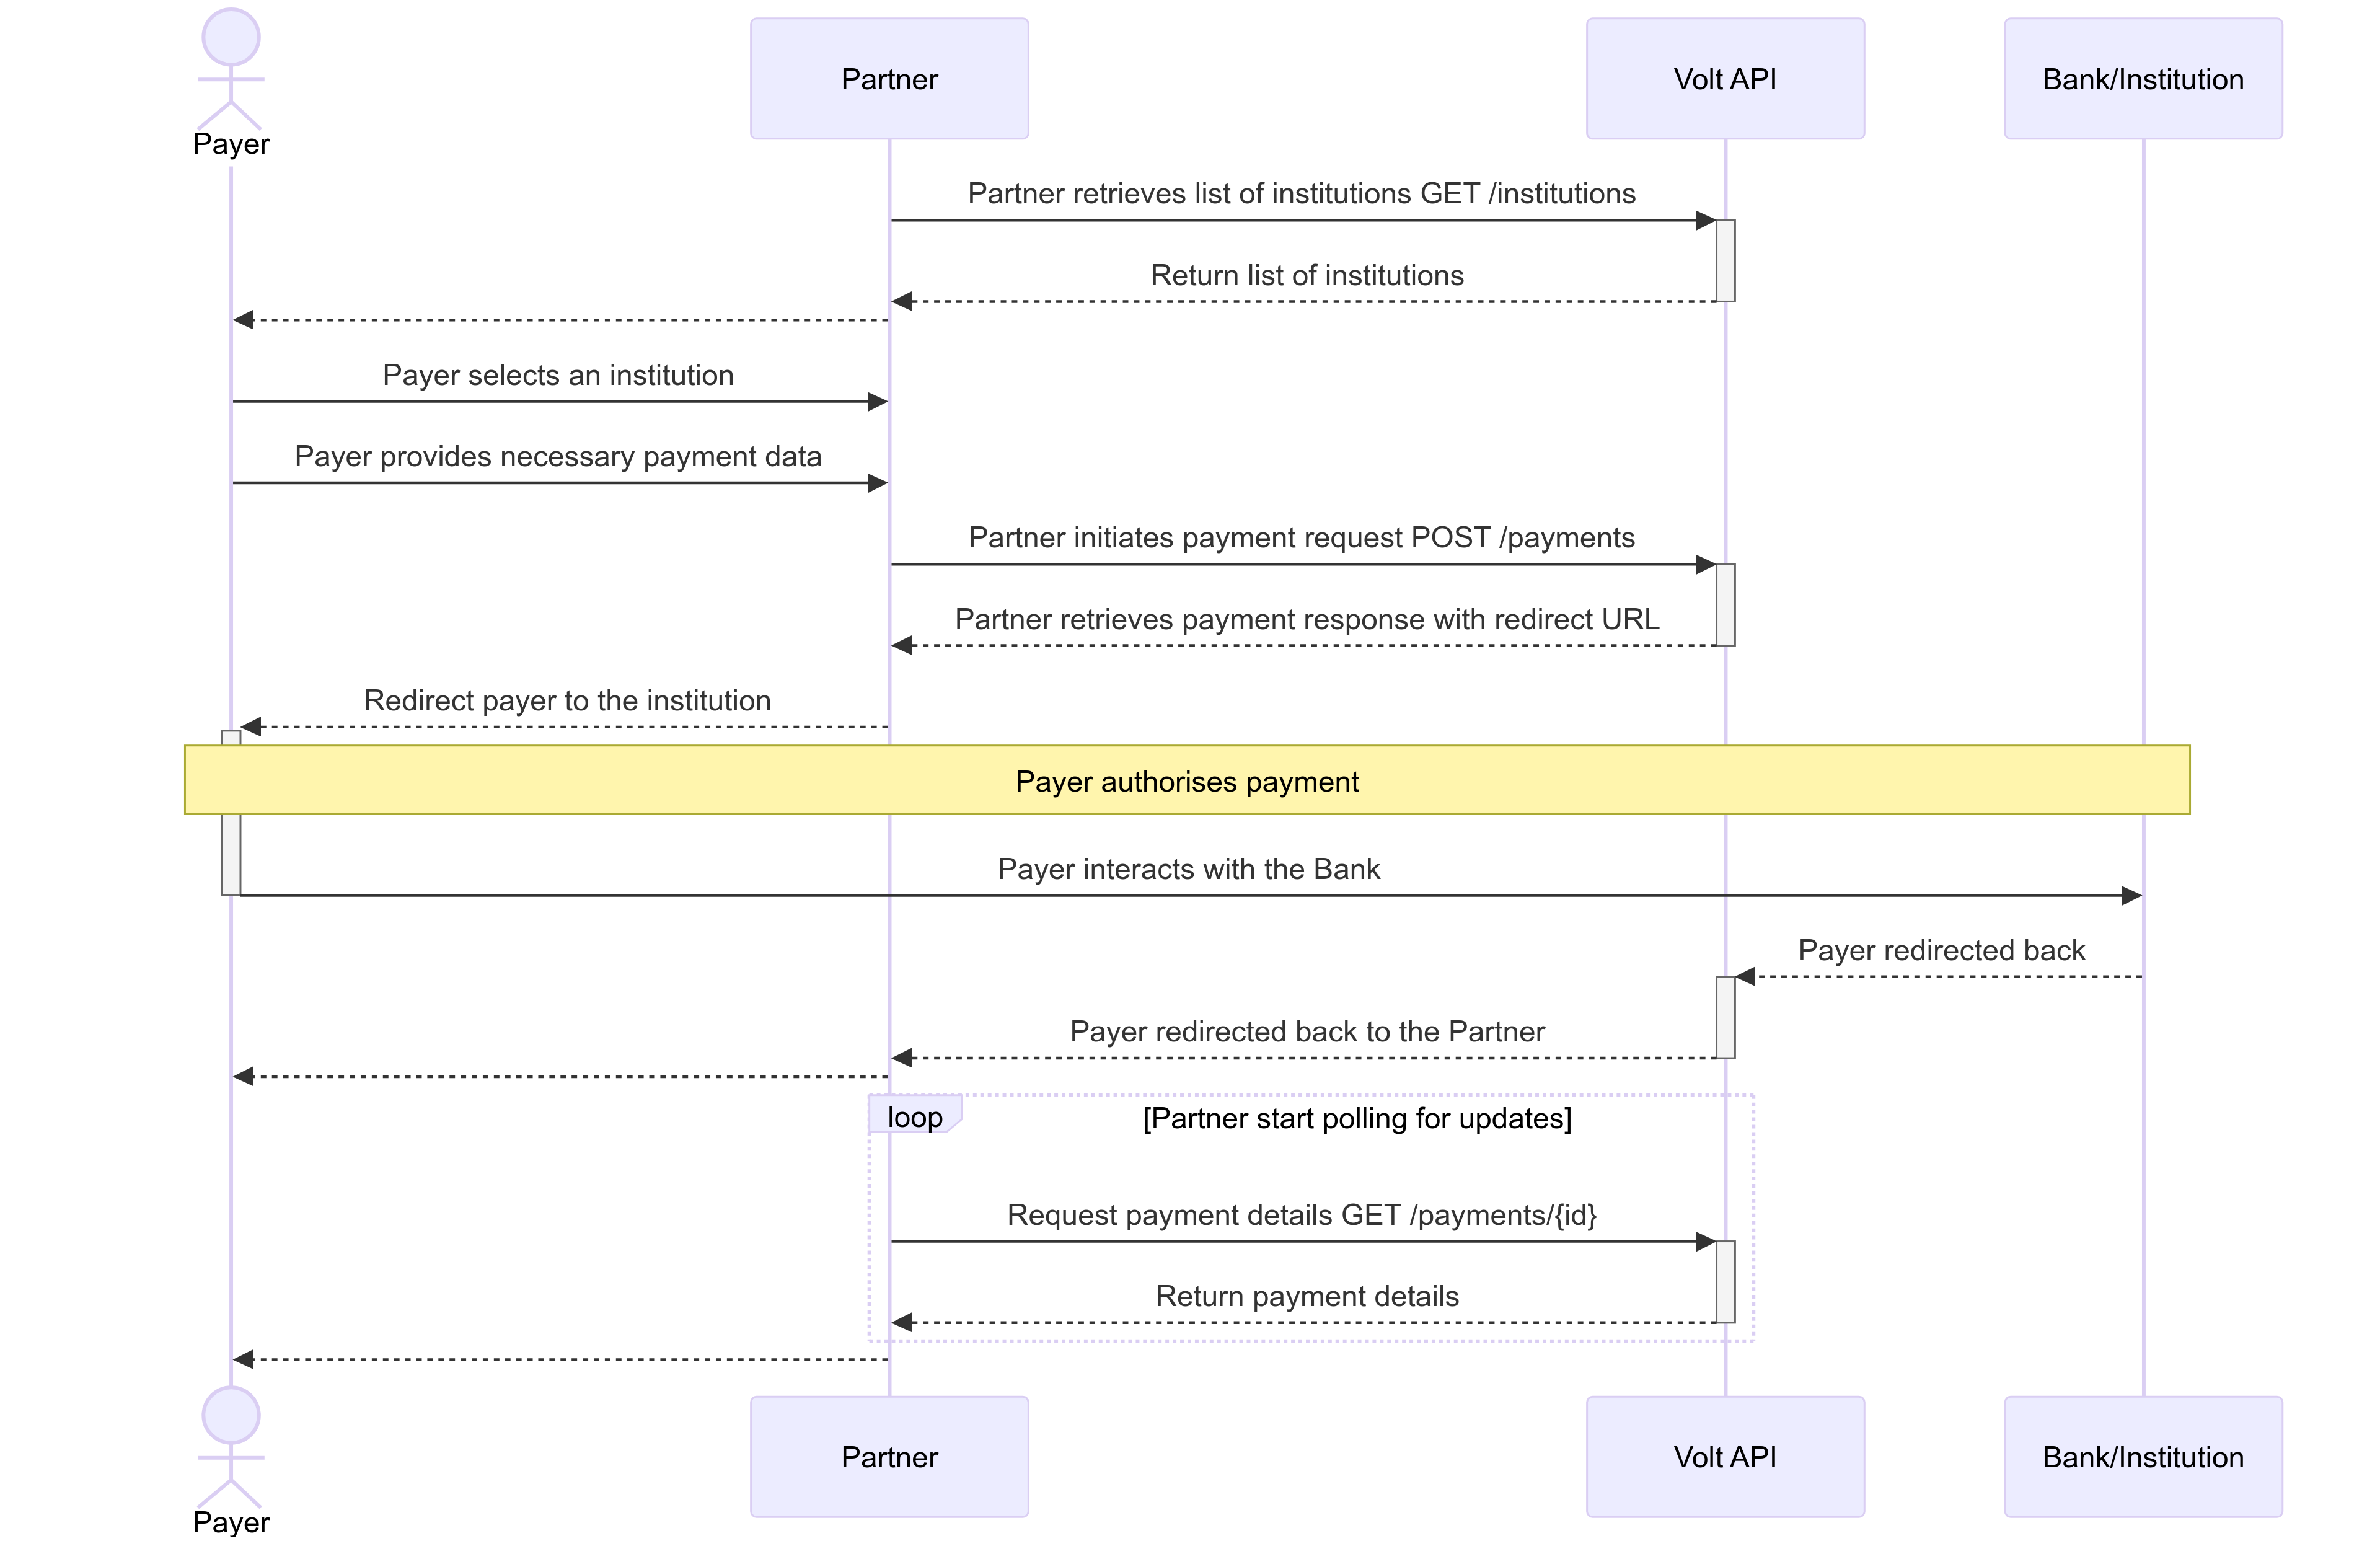
The payer is redirected to the institution’s user interface (UI) to authenticate and authorise the payment. This flow delegates the responsibility of handling user credentials and authorisation to the institution’s secure environment.

Prerequisite
In order to use Volt’s API you need to be authenticated. Use this guide to handle authentication with Volt’s API.
Steps:
-
Partner retrieves the list of institutions.
Use this guide to build institution selection component. -
Payer selects the institution.
User selects their bank from the institution selection interface. -
Partner collects payment data from the payer.
Gather necessary data such as currency, amount, and required account identifiers. - Partner initiates payment request.
Use thePOST /paymentsendpoint. The response includes a redirect URL to which the user should be redirected.
API-only integration requires passing X-Volt-Initiation-Channel HTTP header with value api.
{
    //...
    "paymentInitiationFlow": {
        "status": "PROCESSING",
        "details": {
          "reason": "AWAITING_USER_REDIRECT",
            "redirect": {
                "url": "https://vo.lt/short",
                "directUrl": "https://myBank.com/authorisation?code=xyz"
            }
        }
    }
    //...
}-
Payer interacts with the institution.
The user completes authentication and authorisation within the selected bank interface. -
Payer returns to the partner.
Payer is redirected to the return URL provided in thePOST /paymentsrequest. -
Partner receives payment details and authorisation status.
Poll theGET /payments/{id}endpoint until the payment initiation flow status changes fromPROCESSINGto a final state (e.g.,FINISHED,EXCEPTION,ABORTED). - Partner receives the payment notification about the payment status.
Notification (webhook) will be sent to you.
You can configure payment notifications in the Fuzebox or pass it directly in the POST /payments request.
A detailed guide on configuring notifications in the Fuzebox can be found here.
Special Scenario:
For certain institutions (mostly in Spain), additional input REDIRECT_TYPE may be required. This involves sending a PATCH /payments/{id} request with the selected redirect type before proceeding with user redirection.
You will be informed about this requirement when calling POST /payments for the first time
{
    // ...
    "paymentInitiationFlow": {
        "status": "WAITING_FOR_INPUT",
        "requiredInput": [
             {
               "name": "REDIRECT_TYPE",
               "propertyPath": "openBankingEU.redirectType",
               "allowedValues": [
                   {
                       "name": "APP",
                       "value": "app",
                       "description": null
                   },
                   {
                       "name": "WEB",
                       "value": "web",
                       "description": null
                   }
               ]
             }
        ]
    }
}
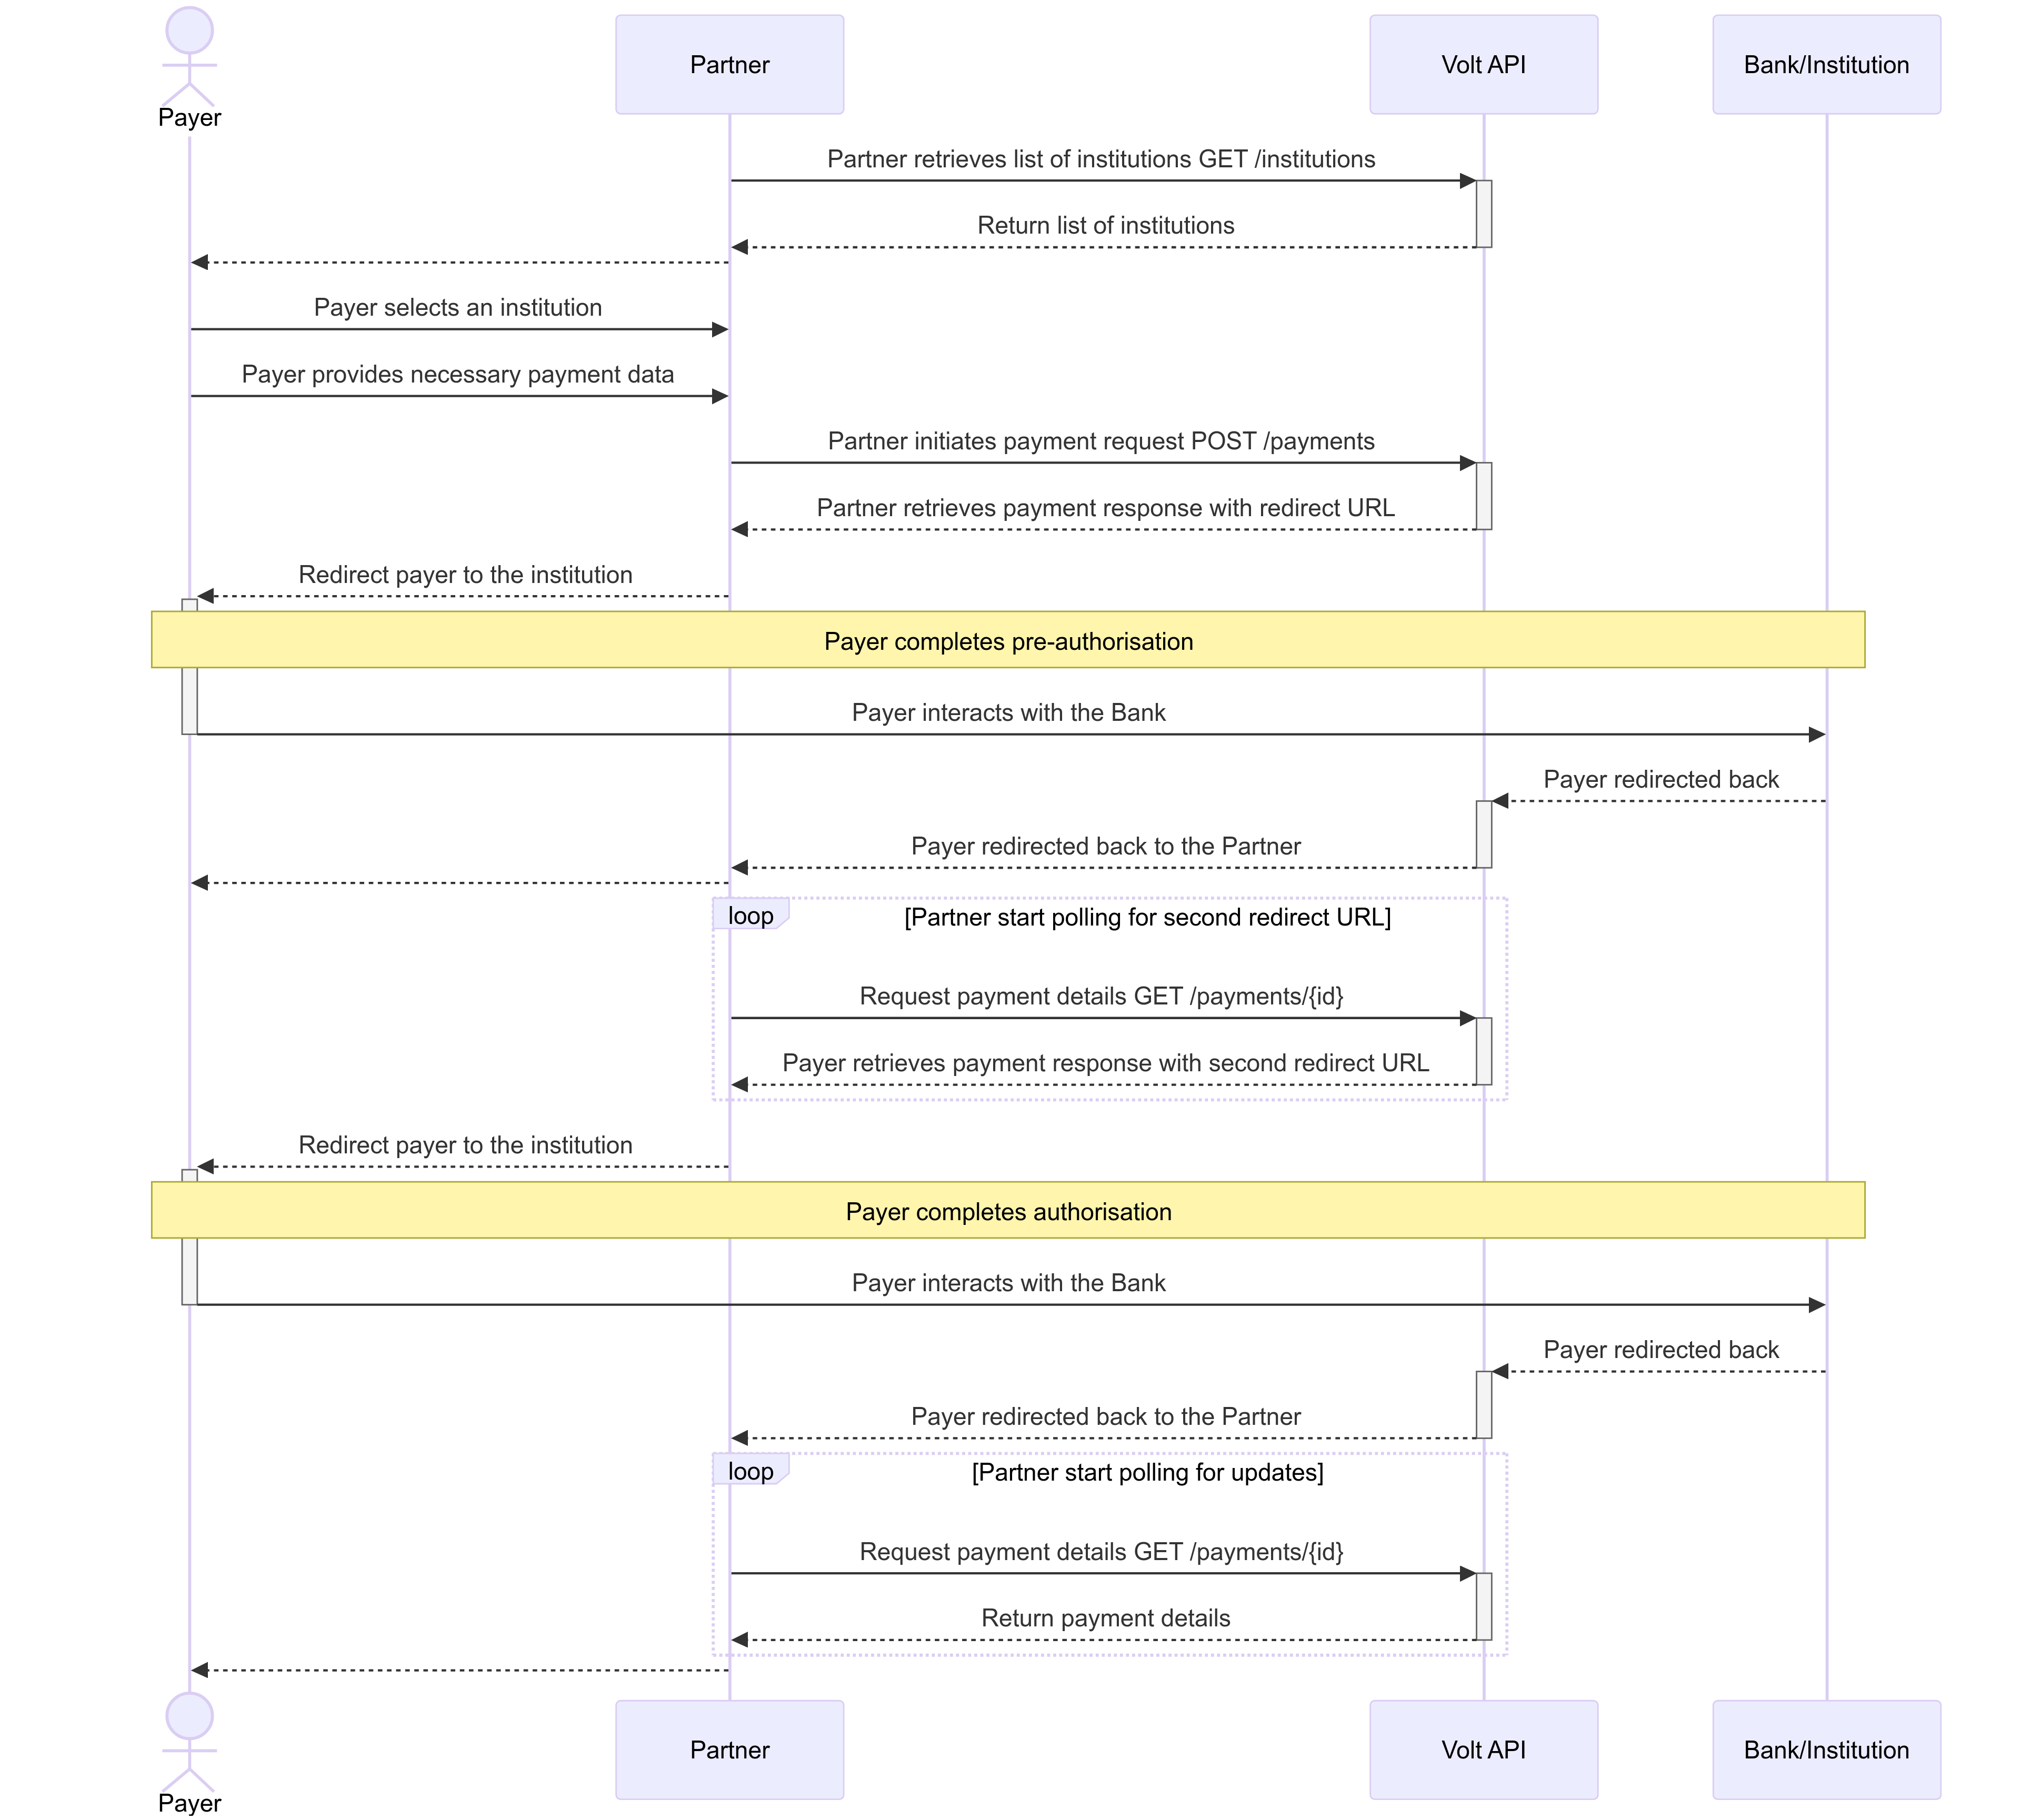
The payer is redirected to the institution’s user interface (UI) to authenticate and authorise the payment. However, authentication and authorisation are two separate steps, which results in two separate redirects. This flow delegates the responsibility of handling user credentials and authorisation to the institution’s secure environment.

Prerequisite
In order to use Volt’s API you need to be authenticated. Use this guide to handle authentication with Volt’s API.
Steps:
-
Partner retrieves the list of institutions.
Use this guide to build institution selection component. -
Payer selects the institution.
User selects their bank from the institution selection interface. -
Partner collects payment data from the payer.
Gather necessary data such as currency, amount, and required account identifiers. - Partner initiates payment request.
Use thePOST /paymentsendpoint. The response includes a redirect URL to which the user should be redirected.
API-only integration requires passing X-Volt-Initiation-Channel HTTP header with value api.
{
    //...
    "paymentInitiationFlow": {
        "status": "PROCESSING",
        "details": {
          "reason": "AWAITING_USER_REDIRECT",
            "redirect": {
                "url": "https://vo.lt/short",
                "directUrl": "https://myBank.com/authorisation?code=xyz"
            }
        }
    }
    //...
}-
Payer interacts with the institution.
The user completes authentication within the selected bank interface. -
Payer returns to the partner.
Payer is redirected to the return URL provided in thePOST /paymentsrequest. - Partner receives payment details and authorisation status.
Poll theGET /payments/{id}to obtain second redirect URL.
{
    //...
    "paymentInitiationFlow": {
        "status": "PROCESSING",
        "details": {
          "reason": "AWAITING_USER_REDIRECT",
            "redirect": {
                "url": "https://vo.lt/short",
                "directUrl": "https://myBank.com/authorisation?code=xyz"
            }
        }
    }
    //...
}-
Payer interacts with the institution.
The user completes authorisation within the selected bank interface. -
Payer returns to the partner.
Payer is redirected to the return URL provided in thePOST /paymentsrequest. -
Partner receives payment details and authorisation status.
Poll theGET /payments/{id}endpoint until the payment initiation flow status changes fromPROCESSINGto a final state (e.g.,FINISHED,EXCEPTION,ABORTED). - Partner receives the payment notification about the payment status.
Notification (webhook) will be sent to you.
You can configure payment notifications in the Fuzebox or pass it directly in the POST /payments request.
A detailed guide on configuring notifications in the Fuzebox can be found here.
Special Scenario:
Calling GET /payments/{id} after payer has authenticated within the institution and returned to partner might return information about decoupled flow.
{
    // ...
    "paymentInitiationFlow": {
        "status": "PROCESSING",
        "details": {
            "reason": "AWAITING_DECOUPLED_AUTHORISATION"
        }
    }
}
In this case there is no second redirect to the institution. Instead, payer needs to authorise the payment using external device (usually a banking app on a mobile phone). Partner should keep polling GET /payments/{id} endpoint until the payment initiation flow status changes from PROCESSING to a final state (e.g., FINISHED, EXCEPTION, ABORTED).
Embedded authorisation flow is a bit complex and requires the partner to build a lot of UI elements, and handle underlying logic.
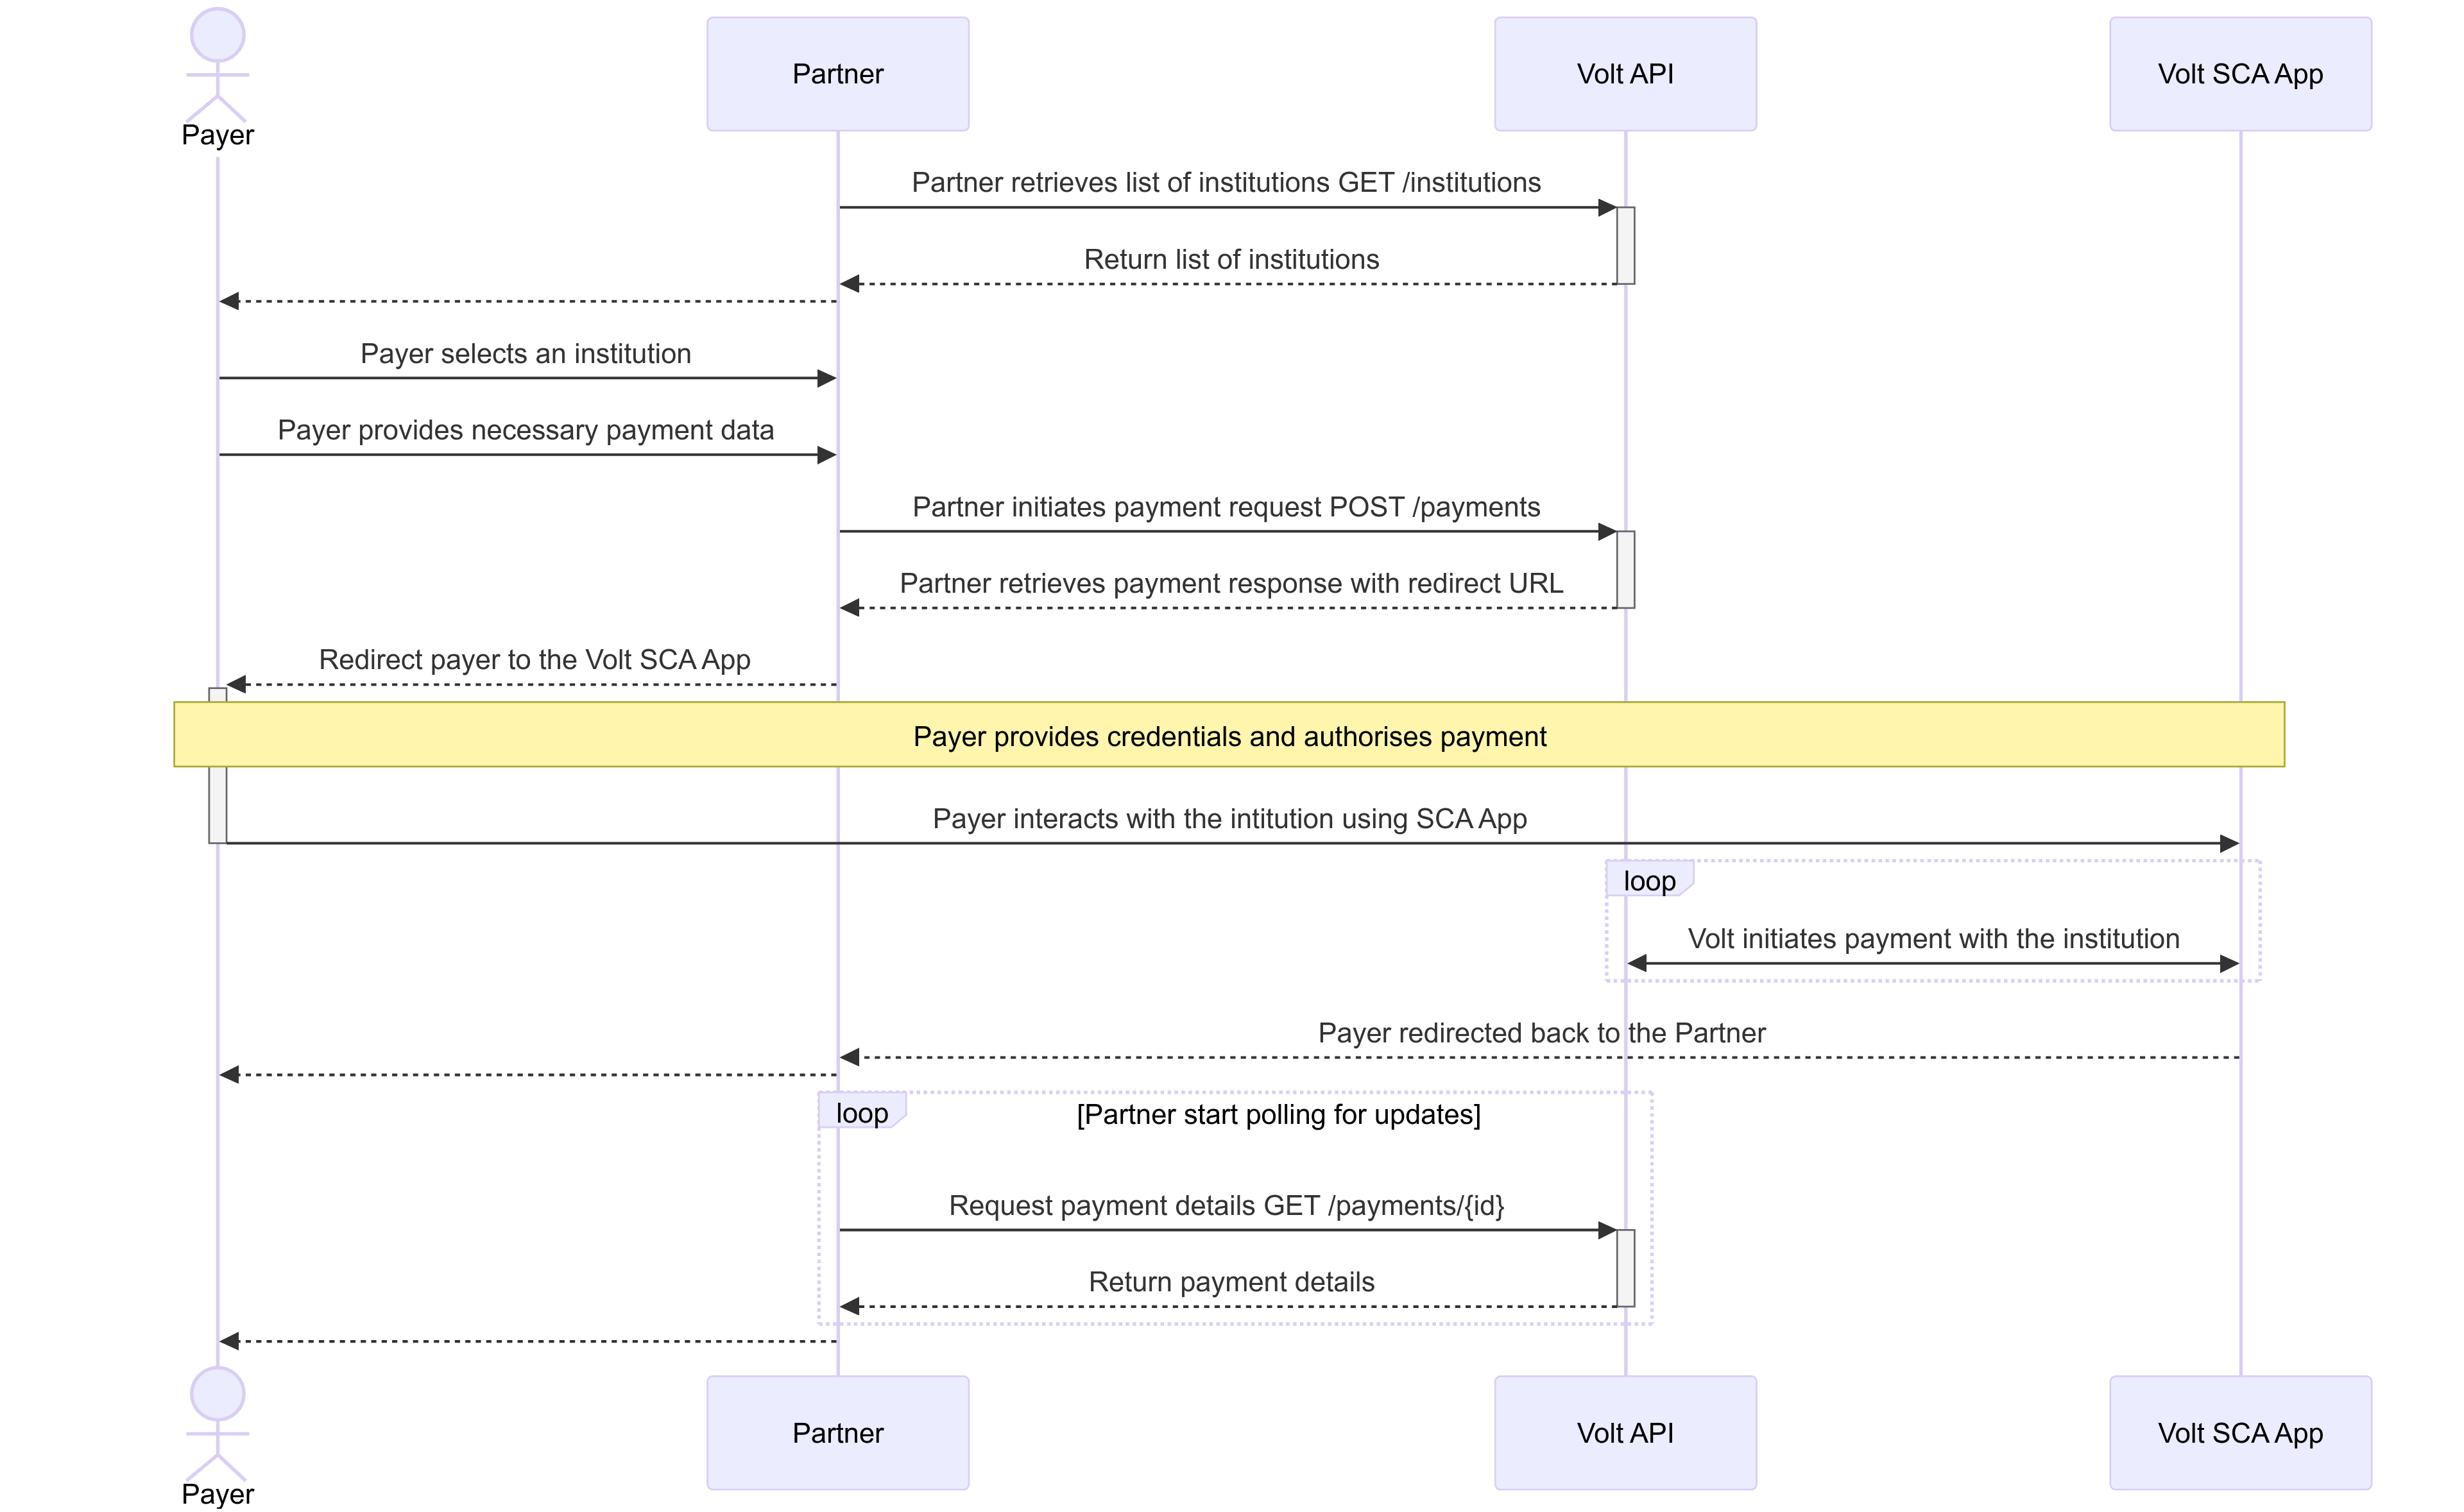
To make that part easier, or even possible, Volt offers an SCA App intermediary part of the flow that handles payer’s credentials gathering, as well as SCA method/code collection.
Prerequisite
In order to use Volt’s API you need to be authenticated. Use this guide to handle authentication with Volt’s API.
Steps:
-
Partner retrieves the list of institutions.
Use this guide to build institution selection component. - Payer selects the institution.
User selects their bank from the institution selection interface.
-
Partner collects payment data from the payer.
Gather necessary data such as currency, amount, and required account identifiers. - Partner initiates payment request.
Use thePOST /paymentsendpoint. The response includes a redirect URL to Volt’s SCA App which the user should be redirected.
API-only integration requires passing X-Volt-Initiation-Channel HTTP header with value api.
{
    //...
    "paymentInitiationFlow": {
        "status": "PROCESSING",
        "details": {
            "reason": "AWAITING_USER_REDIRECT",
            "redirect": {
                "url": "https://vo.lt/short",
                "directUrl": "https://sca.volt.io/{paymentId}"
            }
        }
    }
    //...
}-
Payer interacts with the SCA App.
The user completes authentication and authorisation within Volt’s SCA App.
This process is managed by Volt on behalf of the partner. -
Payer returns to the partner.
Payer is redirected to the return URL provided in thePOST /paymentsrequest. -
Partner receives payment details and authorisation status.
Poll theGET /payments/{id}endpoint until the payment initiation flow status changes fromPROCESSINGto a final state (e.g.,FINISHED,EXCEPTION,ABORTED). - Partner receives the payment notification about the payment status.
Notification (webhook) will be sent to you.
You can configure payment notifications in the Fuzebox or pass it directly in the POST /payments request.
A detailed guide on configuring notifications in the Fuzebox can be found here.
IMPORTANT!
If you wish to implement this flow, contact Volt Support to check if you’re eligible and properly regulated for this.
With the embedded authorisation flow payer’s credentials to the selected institution are captured by the partner and used for authentication at the institution without redirecting the payer to the Volt’s nor bank’s UI.
Apart of collecting the payer’s credentials by the partner, embedded flow often requires partner to also handle SCA process, this is collecting information about selected SCA method and/or SCA code.

Prerequisite
In order to use Volt’s API you need to be authenticated. Use this guide to handle authentication with Volt’s API.
Steps:
-
Partner retrieves the list of institutions.
Use this guide to build institution selection component. - Payer selects the institution.
User selects their bank from the institution selection interface.
-
Partner collects payment data from the payer.
Gather necessary data such as currency, amount, and required account identifiers. - Partner initiates payment request.
Use thePOST /paymentsendpoint. The response indicates the required user credentials (e.g., username & password).
API-only integration requires passing X-Volt-Initiation-Channel HTTP header with value api.
{
    // ...
    "paymentInitiationFlow": {
        "status": "WAITING_FOR_INPUT",
        "requiredInput": [
            {
                "name": "SCA_USERNAME",
                "propertyPath": "sca.username"
            },
            {
                "name": "SCA_PASSWORD",
                "propertyPath": "sca.password"
            }
        ]
    }
}-
Payer provides credentials.
Partner provides an interface for the payer to input username and password that will be used to authenticate with the institution. - Partner passes payer’s credentials.
Use thePATCH /payments/{id}endpoint. The response may list available SCA methods.
{
    // ...
    "sca": {
        "username": "shopper_bank_account_username"
        "password": "shopper_password"
    }
}-
Payer selects SCA method (if more than one is available).
User chooses from available methods likePUSH_OTPorSMS_OTP. -
Partner passes selected SCA method (if more than one is available).
Use thePATCH /payments/{id}endpoint. Depending on the method, additional inputs like an SCA code may be required. -
Payer provides SCA code (if applicable).
-
Partner passes SCA code (if applicable).
Finalise the authorisation using thePATCH /payments/{id}endpoint. -
Partner receives payment details and authorisation status.
Poll theGET /payments/{id}endpoint until the status changes to a final state. - Partner receives the payment notification about the payment status.
Notification (webhook) will be sent to you.
You can configure payment notifications in the Fuzebox or pass it directly in the POST /payments request.
A detailed guide on configuring notifications in the Fuzebox can be found here.
Special Scenario:
Integration with the SCA App simplifies the embedded flow by handling credential gathering and SCA method/code collection.
Decoupled authorisation requires additional authorisation from the payer, but it is done outside of the API integration. In most cases, payer needs to authorise the payment via institution’s application on a mobile device. What’s important, decoupled authorisation is an additional step of authorisation which can happen in every authorisation flow.
When decoupled authorisation is required, following response will be returned:
{
    //...
    "paymentInitiationFlow": {
        "status": "PROCESSING",
        "details": {
            "reason": "AWAITING_DECOUPLED_AUTHORISATION"
        }
    }
    //...
}
In most scenarios decoupled authorisation can be triggered after payer returns from the institution to the partner. However, there are situations when decoupled flow is triggered right after calling POST /payments endpoint. Partner’s integration should be prepared for such scenarios.
- On this page
- API-only
- Integration guides
- Decoupled authorisation