![]()
As an Adobe (Magento) platform user, you can use the pre-configured plugin with the Volt Hosted Checkout. With just a few steps you can activate instant bank transfers for your customers and benefit from additional payment options and increased conversions.
Version Compatibility
Requires at least version: 2.2.0- 2.4.6
PHP version according to the requirements of your store version
If you are using another version of Adobe contact our team at support@volt.io.
Download and install the plugin
- Execute the following command in the Magento 2 root folder:
composer require volt-io/volt-io-magento - Enter the following commands to enable the module:
bin/magento module:enable Volt_Payment
bin/magento setup:upgrade
bin/magento setup:di:compile
bin/magento setup:static-content:deploy
bin/magento cache:flush
Access the plugin configuration page:
- In the Magento Marketplace administration panel, go to Stores > Configuration.
- Under the Sales section, click on Payment Methods and select Configure Payment Methods.
- Locate the Volt Payment payment option and click on it to access the configuration settings.
You can also refer to the instructions directly on GitHub.
Choose the environment
You need to select which environment you will configure. Please note that you can only have one environment: Sandbox (for testing) or Production (for live traffic) configured at a time. The configuration steps for both environments are the same. To switch between the environments in Fuzebx use the toggle in the top right corner. In the plugin setup select “Yes/No” for “Enable Sandbox environment”.


Correct Environment
Always make sure you are configuring in the same environment in Fuzebox and on Adobe (Magento).
Generate the access credentials
To start using Volt payments, you first need to get a set of access credentials. These consist of your Volt customer credentials and application credentials. You will be able to generate them via the Volt merchant portal (Fuzebox). Volt team will enable your access to the portal by creating an account for you.
Generate the API username and password (NOT your username and password for Fuzebox)
- Login to Fuzebox.
- Generate Customer Credentials. You can find the Credentials section in the Configuration > Customers tab in Fuzebox.
- Copy your Username and paste it into the Customer Username field on the plugin configuration page.
- Copy your Password safely and paste it into the Merchant Password field on the plugin configuration page.

Generate the Client id and Client Secret
- In Fuzebox register an application to receive your Client id and Client Secret. During this step, enter the following URL for all statuses (replace
your-store-url.comwith your store URL):https://your-store-url.com/volt/payment/back. - Copy your Client ID from Fuzebox and paste it into the Client ID field on the plugin configuration page.
- Copy your Client Secret from Fuzebox and paste it into the Client Secret field on the plugin configuration page.
Please note that you should copy all credentials from Fuzebox immediately. The credentials will be encrypted once you close the window. If this happens, please regenerate the credentials in Fuzebox.
Setup notifications
- Go back to Fuzebox and access the Payment Notifications section in Configuration > Applications > (your application) tab in Fuzebox.
- Configure the settings as explained in the guide using the following URL as the Webhook URL:
https://your-store-url.com/volt/payment/notification(replaceyour-store-url.comwith your store URL).
You can also refer to the instructions directly on GitHub.
Status mapping
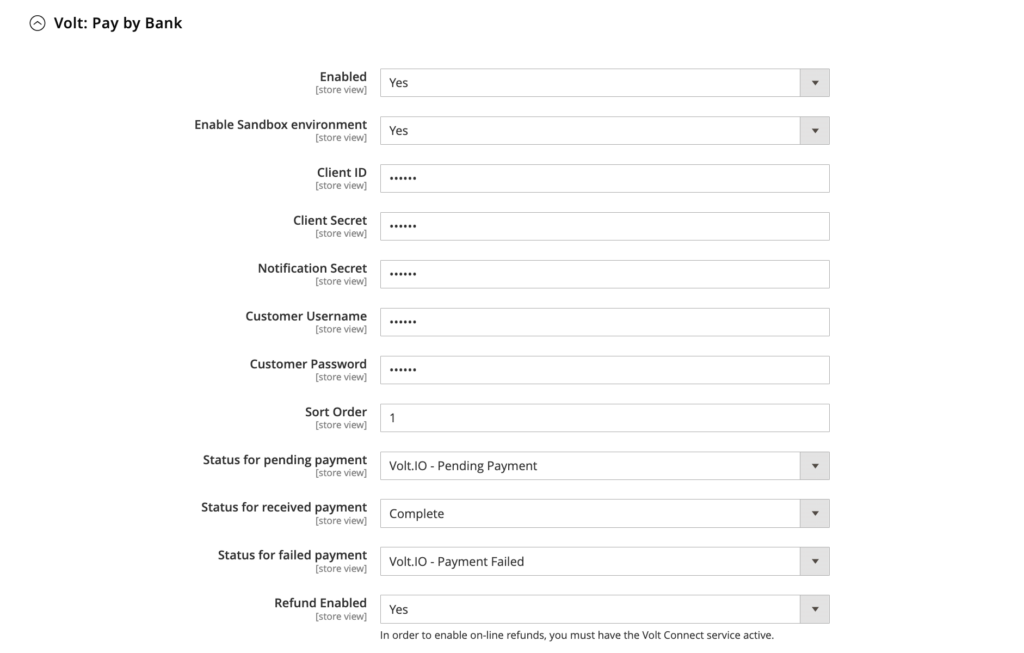
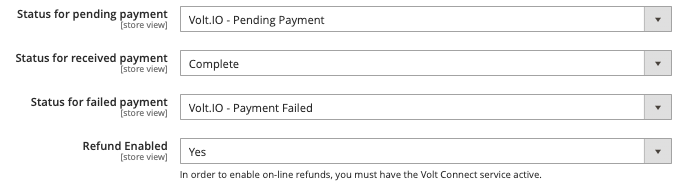
You can adjust the mapping of Volt payment statuses to your shop’s order statuses:
- Status for pending payment field refers to the status you want to set for the order after the payment is started but was not yed finalized or the funds were not yet transferred (Volt PENDING and COMPLETED statuses).
- Status for received payment field refers to the status you want to set for the order after the payment is received in your Volt account (Volt status RECEIVED).
- Status for failed payment field to the status you want to set for the order after the payment failed (any of the Volt FAILED statuses).
Enable
- Set the “Enabled” field to “Yes”.
- If you wish to use Volt Refunds as well, set the “Refunds Enabled” filed to “Yes”.
- Save the configuration settings by clicking Save Config in the top right corner.
