
The Volt: Pay by Bank plugin at Prestashop gives the power to accept real-time payments directly from your customers’ bank accounts. Faster funds. Fewer costs. Seamless integration in just a few easy steps.
Requires Prestashop versions 1.7.6 – 8.1.
Step 1: Get access credentials to the Volt merchant portal (Fuzebox)
In order to start using Volt payments, you first need to get a set of access credentials. These consist of your Volt customer credentials and application credentials. You will be able to generate them via the Volt merchant portal (Fuzebox). Volt team will enable your access to the portal by creating an account for you.
- Activate your account by logging in after you receive the invitation email.
- Follow the steps described here. You will need to generate customer credentials as well as register an application to receive your ClientID and Client Secret. Once this is done, you can move on to the next step. NOTE that the Payment return URLs are ineffective and you can set them to your main page or any other general URL.
Please note that you should copy all credentials from Fuzebox immediately and securely store them. The customer password will be encrypted once you close the window.
Step 2: Install Volt Addon
First, you need to find the Volt plugin on the marketplace:
- Log in to the Prestashop Marketplace administration panel.
- Go to Modules tab and search for “Pay by Bank”, you can also just follow the link.
- Once you have found the Volt: Pay by Bank payment module, click Install.
To upload Volt plugin from a zip package:
- Log in to the Prestashop Marketplace administration panel.
- Go to Modules > Module Manager and click “Upload a module”.
Once the installation is complete, the system will automatically take you to the Module Configuration.
Step 3: Configure Pay by Bank Module
- In the Prestashop Marketplace administration panel go to Modules > Marketplace.
- Click “Configure”.
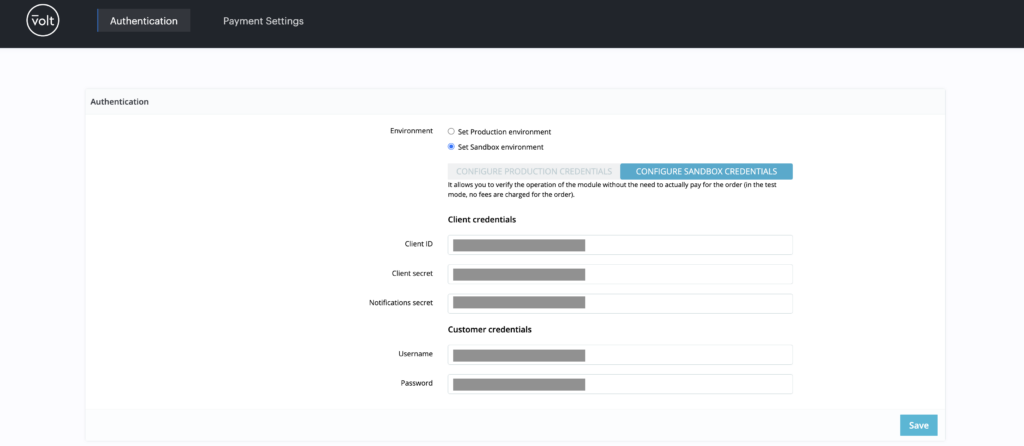
- Configure all the credentials in the “Authentication” tab:
- Choose the Environment that you want to set up: Production or Sandbox.
- Client ID (copied from Fuzebox)
- Client secret (copied from Fuzebox)
- Username (copied from Fuzebox)
- Password (copied from Fuzebox)
- Click “Save”.
- In the “Payment settings” tab, you can modify the default payment status mapping.
Make sure you have Volt statuses merked as “Yes”, this is needed.
Step 4: Notification setup
- While you are in the Settings section of the Prestashop module manager, copy the Notification web hook URL.
- Go back to Fuzebox and access the Notifications section.
- Configure the settings as explained in the guide using the copied URL.
In order to disable/update/uninstall the plugin, go to the initial module management tab and use the drop-down menu.
